Difference between revisions of "Fluid reactor"
AdrianOkay (talk | contribs) (→Safety) |
AdrianOkay (talk | contribs) (→Safety) |
||
| Line 226: | Line 226: | ||
But you wouldn't ''really'' want to do that, would you? <span style="font-size:75%">At least not in your own reactor.</span> | But you wouldn't ''really'' want to do that, would you? <span style="font-size:75%">At least not in your own reactor.</span> | ||
'''Field Note:''' If your reactor is composed of | '''Field Note:''' If your reactor is composed of an array of heat exchangers and fans and they all melt in the same time you can actually get from 0% to 100% | ||
(Learned this the BAD way) | (Learned this the BAD way, and it's pretty easy to reproduce, for the sake of Newton, keep an eye on it all times!) | ||
Revision as of 12:37, 26 July 2017
The most recent version of IC² is V2.8.<html>.
The Fluid Reactor, also known as the Pressure Vessel Reactor, is an alternative use of the existing EU reactor. Instead of directly outputting EU, it outputs Heat in the form of Hot Coolant. When set up correctly, it is more efficient than a standard EU reactor.
Construction[edit]
In order to build a basic Fluid Reactor, you will need the following, at a minimum:
- 1x
 Nuclear Reactor
 - 6x
 Reactor Chambers
 - 1x
 Reactor Access Hatch
 - 1x
 Reactor Redstone Port
 - 1x
 Reactor Fluid Port
 - 95x
 Reactor Pressure Vessel blocks
You can swap out Pressure Vessel blocks for additional interface blocks as your setup demands.
Building the Fluid Reactor multiblock is simple:
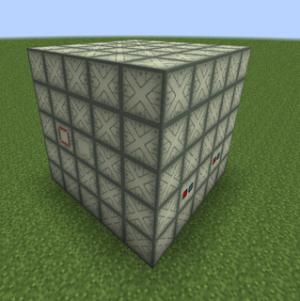
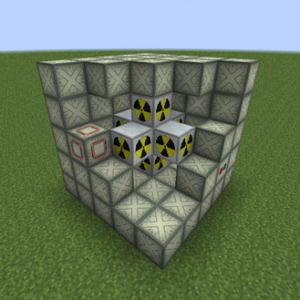
It is a 5x5x5 cube with a 3x3x3 hollow center in which the EU reactor set is placed. A minimum of 3 interface blocks (Access Hatches and Fluid Ports) are required.
|
|
Usage[edit]
The Fluid Reactor uses all the same components (Fuel Rods, Heat Vents, etc.) as the EU reactor in its internal inventory. However, it also has two 10,000 mB liquid tanks, seen on either side of the GUI: a blue Coolant tank on the left and a red Hot Coolant tank on the right. Either liquid can be added or removed with ![]() Universal Fluid Cells through the inventory slots above and below each tank.
Universal Fluid Cells through the inventory slots above and below each tank.
Fluid Ports can also be used to add or remove Coolant. Placing a ![]() Fluid Ejector Upgrade in the Fluid Port's interface will allow it to eject Hot Coolant from the reactor into an adjacent
Fluid Ejector Upgrade in the Fluid Port's interface will allow it to eject Hot Coolant from the reactor into an adjacent ![]() Fluid Distributor,
Fluid Distributor, ![]() Fluid Regulator, or fluid transfer systems from other mods.
Fluid Regulator, or fluid transfer systems from other mods.
Instead of an EU reading at the bottom, the fluid reactor indicates HU/t (heat units per tick). As you place more heat vents and fuel rods inside of the reactor, that reading will rise - but not as simply as in the EU reactor's case.
Say you ignore coolant entirely and toss in a ![]() Fuel Rod (Uranium) and a
Fuel Rod (Uranium) and a ![]() Heat Vent next to each other inside the reactor. When you turn it on, the core temperature will rise, and your HU/t will remain at 0. Uh oh! The heat vent is working fine - but it's moving heat to the shell of the core reactor, instead of into the surrounding air like the EU reactor, and you didn't provide any coolant to deal with the problem. However, core temperature cannot be cooled (once heated) by simply applying coolant; you need
Heat Vent next to each other inside the reactor. When you turn it on, the core temperature will rise, and your HU/t will remain at 0. Uh oh! The heat vent is working fine - but it's moving heat to the shell of the core reactor, instead of into the surrounding air like the EU reactor, and you didn't provide any coolant to deal with the problem. However, core temperature cannot be cooled (once heated) by simply applying coolant; you need ![]() Reactor Heat Vents (etc.) to transfer the core heat to the casing of the internal regular reactor, and coolant to absorb that transferred heat.
Reactor Heat Vents (etc.) to transfer the core heat to the casing of the internal regular reactor, and coolant to absorb that transferred heat.
In short, to maintain a fluid reactor, you need:
- Fuel Rods to generate heat,
- Heat Vents to push that heat around and eventually into coolant, and
- a sustainable source of Coolant to absorb and eject all the face-melting heat your neutron-reflected Quad Fuel Rods produce.
Note: Unlike the EU reactor, the fluid reactor's power generation (HU/t) is not dependent on the Fuel Rods, but rather the amount of Heat Vents. Unmanaged Fuel Rod heat in the EU reactor would simply make the reactor overheat faster but not reduce its power output; in the Fluid Reactor, unmanaged Fuel Rod heat is stored in the reactor core.
The Fluid Reactor's power output is essentially measured in hot coolant: if you're not producing that, you're not producing power. (Although if you're heating your core, technically you're banking up power to output later. Or you're about to be testing how good your protective shielding is. HAYO!)
Coolant Cycle[edit]
Operating the Fluid Reactor will heat Coolant into Hot Coolant which is then pumped out into a ![]() Liquid Heat Exchanger (likely several, depending on how fast your reactor produces heat), which will produces HU and outputs Coolant which goes right back into the Fluid Reactor to complete the cycle.
Liquid Heat Exchanger (likely several, depending on how fast your reactor produces heat), which will produces HU and outputs Coolant which goes right back into the Fluid Reactor to complete the cycle.
The heat that the Liquid Heat Exchanger Outputs can be used to power a ![]() Stirling Generator to directly generate EU, or to heat a
Stirling Generator to directly generate EU, or to heat a ![]() Steam Generator to generate either Steam or Superheated Steam.
Steam Generator to generate either Steam or Superheated Steam.
Out of all the ways to generate power, superheated steam is the best; with the correct setup, it can produce significantly more power than a standard EU reactor!
Safety[edit]
The fluid reactor is inherently safe! This may or may not be a good thing, depending on just how HAYO you are.
In order to function, the fluid reactor needs its 5x5x5 outer shell completely intact. At 85% core heat, that shell will start melting into lava source blocks - and when it does, your reactor will turn off, since it is no longer a complete fluid reactor. It is important to note that even though the reactor won't gain any extra heat, it won't lose any, either, unless you do something to remove it - and so your casing will continue to melt (judging by past observations, only the standard pressure vessel blocks will, not any of the interfaces). And of course anyone within the 7x7x7 area will be damaged by radiation ticks, since the core heat is also > 70%.
In order to make a Fluid Reactor actually explode (without standing next to it and playing with ![]() Heat-Capacity Reactor Plating, anyway), you'd need to take your heat from < 85% to 100% in a single reactor tick, which would mean producing over 1500 HU/t at just the right (wrong) time.
Heat-Capacity Reactor Plating, anyway), you'd need to take your heat from < 85% to 100% in a single reactor tick, which would mean producing over 1500 HU/t at just the right (wrong) time.
But you wouldn't really want to do that, would you? At least not in your own reactor.
Field Note: If your reactor is composed of an array of heat exchangers and fans and they all melt in the same time you can actually get from 0% to 100% (Learned this the BAD way, and it's pretty easy to reproduce, for the sake of Newton, keep an eye on it all times!)

