Difference between revisions of "Canning Machine"
m (Removed extra (empty) history section) |
m (Fixed different modes not forming a table properly + updated usage section + updated energy use section) |
||
| Line 22: | Line 22: | ||
{{Experimental}} | {{Experimental}} | ||
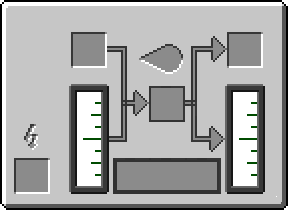
The IC2v2.1.463-experimental (and likely a few earlier ones, not sure what) uses a new interface for the Canning Machine. This provides it with several additional uses, but is significantly more complex. The new interface has a button in the center which will switch between four different modes. There are also two separate tanks for holding fluids. | The IC2v2.1.463-experimental (and likely a few earlier ones, not sure what) uses a new interface for the Canning Machine. This provides it with several additional uses, but is significantly more complex. The new interface has a button in the center which will switch between four different modes. There are also two separate tanks for holding fluids. | ||
1) | {| | ||
|[[Image:GUI Canning Machine A.png]]||1) Canning - Normal canning mechanisms | |||
|- | |- | ||
2) | |[[Image:GUI Canning Machine B.png]]||2) Drain from Cell into Tank - Fills the right tank with the fluid that was in the bucket or cell placed in the top left slot. | ||
|- | |- | ||
3) | |[[Image:GUI Canning Machine C.png]]||3) Fill Cell from Tank - Fills the bucket or cell placed in the top left slot with the fluid in the left tank. | ||
|- | |- | ||
4) | |[[Image:GUI Canning Machine D.png]]||4) Fluid Enrich (Tank or Cell) - Enriches the fluid in the left tank with the item in the center slot. Either places the fluid in the container placed in the top left slot or puts it in the right tank. | ||
|} | |||
The left tank contains the input. The right tank contains the output. Most examples fill the input tank with BuildCraft components. It is not necessary to do this however. Canning machines can transfer fluid from their output tank to an adjacent canning machine's input tank by using the [[Fluid Ejector Upgrade]]. Fill the first canning machine's output tank with Mode 1 listed above. Place the Fluid Ejector Upgrade in the machine, and watch the fluid enter the input tank of the next canning machine. It is possible to manually insert fluids into the left tank by holding shift and right clicking the Canning Machine with a cell of fluid. Make sure that the left tank is empty before doing this. | The left tank contains the input. The right tank contains the output. Most examples fill the input tank with BuildCraft components. It is not necessary to do this however. Canning machines can transfer fluid from their output tank to an adjacent canning machine's input tank by using the [[Fluid Ejector Upgrade]]. Fill the first canning machine's output tank with Mode 1 listed above. Place the Fluid Ejector Upgrade in the machine, and watch the fluid enter the input tank of the next canning machine. It is possible to manually insert fluids into the left tank by holding shift and right clicking the Canning Machine with a cell of fluid. Make sure that the left tank is empty before doing this. | ||
| Line 45: | Line 46: | ||
== Usage == | == Usage == | ||
<!-- Old Info | |||
Supply with food items (top slot) and [[Tin Can]]s (bottom slot). | Supply with food items (top slot) and [[Tin Can]]s (bottom slot). | ||
| Line 58: | Line 59: | ||
Canned Food is eaten by right clicking on the filled can while holding it, like normal food. | Canned Food is eaten by right clicking on the filled can while holding it, like normal food. | ||
Canning Machines are also used to fill Fuel Cans with fuel cells. Six fuel cells or biofuel ones are required to completely fill an empty fuel can. | Canning Machines are also used to fill Fuel Cans with fuel cells. Six fuel cells or biofuel ones are required to completely fill an empty fuel can. --> | ||
===Canning Food=== | |||
The Canning Machine's (potentially ex) main purpose is to fill [[Tin Can]]s with food. In order to do so, supply with [[Canning Machine#Food|food items]] (in the middle slot) and [[Tin Can]]s (in the right slot). | |||
{{Grid/Canning Machine | |||
|can=Tin Can | |||
|input=Bread | |||
|output=Canned Food (Opened) | |||
|OA=3 | |||
}} | |||
Canned Food is eaten by right clicking on the filled can while holding it, like normal food. | |||
===Enriching Fluids=== | |||
The Canning Machine can also be used in order to enrich fluids and items. The following recipes are currently available: | |||
====Making [[Coolant (Fluid)|Coolant]]==== | |||
{| | |||
|- | |||
|{{Grid/Canning Machine | |||
|mode=D | |||
|input-tank=Water | |||
|input-fill=1000 | |||
|input-tank-link=Non-IC Items | |||
|input=Lapis Lazuli Dust | |||
|IA=8 | |||
|output-tank=Coolant | |||
|output-fill=1000 | |||
|output-tank-link=Coolant (Fluid) | |||
}} | |||
||{{Grid/Canning Machine | |||
|mode=D | |||
|input-tank=Distilled Water | |||
|input-fill=1000 | |||
|input-tank-link=Distilled Water | |||
|input=Lapis Lazuli Dust | |||
|output-tank=Coolant | |||
|output-fill=1000 | |||
|output-tank-link=Coolant (Fluid) | |||
}} | |||
|} | |||
====Making [[Biomass]]==== | |||
{{Grid/Canning Machine | |||
|mode=D | |||
|input-tank=Water | |||
|input-fill=1000 | |||
|input-tank-link=Non-IC Items | |||
|input=Bio Chaff | |||
|output-tank=Biomass | |||
|output-fill=1000 | |||
|output-tank-link=Biomass | |||
}} | |||
====Making [[Construction Foam]]==== | |||
{{Grid/Canning Machine | |||
|mode=D | |||
|input-tank=Water | |||
|input-fill=1000 | |||
|input-tank-link=Non-IC Items | |||
|input=CF Powder | |||
|output-tank=Construction Foam | |||
|output-fill=1000 | |||
|output-tank-link=Construction Foam | |||
}} | |||
==Item List== | ==Item List== | ||
===Food=== | ===Food=== | ||
| Line 129: | Line 187: | ||
{{Energy|Input=1 EU/t|Output=-|Storage=-}} | {{Energy|Input=1 EU/t|Output=-|Storage=-}} | ||
Maximum Input: 32 [[EU]]/t before exploding. | Maximum Input: 32 [[EU]]/t before exploding. | ||
The canning machine does not have upgrade slots and as such does not accept upgrades. | <!-- Old-> The canning machine does not have upgrade slots and as such does not accept upgrades.--> | ||
The canning machine has 4 upgrade slots, and can accept [[Overclocker upgrade]]s, [[Transformer upgrade]]s, [[Energy storage upgrade]]s, [[Ejector Upgrade]]s and [[Fluid Ejector Upgrade]]s. | |||
== History == | == History == | ||
Revision as of 14:46, 4 October 2014
| Canning Machine | |
|---|---|
 | |
| Properties | |
| Type | Machine |
| Tool |
|
| Stackable | Yes (64)
|
| Energy Consumption | |
| Max EU Input | 32 EU/t (LV) |
| Technical Details | |
| First appearance | ? |
|
| |
The Canning Machine puts food into Tin Cans, which, can be stacked up to 64. It also is used to refill Fuel Cans and Jetpacks.
To start canning, put the food you want to can in the upper slot and the cans in the lower slot and supply power, either by cable or with a battery in the left slot.
Different foods fill a different number of cans, depending on the type of food. The Item List details the different amounts of cans generated for each type of food. Canned food can be stacked, regardless of what food was used to create it, allowing you to stack different food types and save valuable inventory space. Canning "bad" food, like rotten meat, now creates a different type of food can with the subtext "this looks bad". These cans will give the hunger debuff when eaten.
Note: if you're using BuildCraft Pipes there is a bug in IC2 1.337b where the output sides of the canning machine are reversed. So if you want to attach a pipe to extract filled cans you need to attach it to the left side of the machine.
The most recent version of IC² is V2.8.<html>.
The IC2v2.1.463-experimental (and likely a few earlier ones, not sure what) uses a new interface for the Canning Machine. This provides it with several additional uses, but is significantly more complex. The new interface has a button in the center which will switch between four different modes. There are also two separate tanks for holding fluids.
| 1) Canning - Normal canning mechanisms | |
| 2) Drain from Cell into Tank - Fills the right tank with the fluid that was in the bucket or cell placed in the top left slot. | |
| 3) Fill Cell from Tank - Fills the bucket or cell placed in the top left slot with the fluid in the left tank. | |
| 4) Fluid Enrich (Tank or Cell) - Enriches the fluid in the left tank with the item in the center slot. Either places the fluid in the container placed in the top left slot or puts it in the right tank. |
The left tank contains the input. The right tank contains the output. Most examples fill the input tank with BuildCraft components. It is not necessary to do this however. Canning machines can transfer fluid from their output tank to an adjacent canning machine's input tank by using the Fluid Ejector Upgrade. Fill the first canning machine's output tank with Mode 1 listed above. Place the Fluid Ejector Upgrade in the machine, and watch the fluid enter the input tank of the next canning machine. It is possible to manually insert fluids into the left tank by holding shift and right clicking the Canning Machine with a cell of fluid. Make sure that the left tank is empty before doing this.
The Fluid Enrich mode is currently the method of generating CF Fluid (using CF Powder) which is used to fill the CF Sprayer. It is also used to make coolant by lapis lazuli dusts
Recipe[edit]
The most recent version of IC² is V2.8.<html>.

Usage[edit]
Canning Food[edit]
The Canning Machine's (potentially ex) main purpose is to fill Tin Cans with food. In order to do so, supply with food items (in the middle slot) and Tin Cans (in the right slot).

Canned Food is eaten by right clicking on the filled can while holding it, like normal food.
Enriching Fluids[edit]
The Canning Machine can also be used in order to enrich fluids and items. The following recipes are currently available:
Making Coolant[edit]
|
|
|

Making Biomass[edit]
Making Construction Foam[edit]
Item List[edit]
Food[edit]
Each can of food restores 1 point on the hunger meter. It also adds 3.2 points to your saturation bar. (A second hunger bar that has no limit and will be depleted before your standard hunger bar).
Eating a can of food does not consume the can; instead, it is returned to your inventory, or, if your inventory is full, dropped onto the ground.
After IC² update 1.109, canning bad food will result in a different type of Canned Food that when consumed, gives the Hunger debuff.
| Item | Amount of cans produced |
|---|---|
Energy[edit]
| EU | |
|---|---|
| Input | 1 EU/t |
| Output | - |
| Storage | - |
Maximum Input: 32 EU/t before exploding. The canning machine has 4 upgrade slots, and can accept Overclocker upgrades, Transformer upgrades, Energy storage upgrades, Ejector Upgrades and Fluid Ejector Upgrades.
History[edit]
| Version | Changes |
|---|---|
| Industrial Craft² | |
| 0.90 | The Canning Machine, Empty Can, Canned Food and Canned Food (Opened) are re-released. The Canned Food can stack up to 64. To open a Canned Food, it must be crafted in this manner: Canned Food (Opened) once consumed would heal one heart. (There was no hunger bar then). |
| 1.15 | Canned Food may now be directly consumed, healing 1 hunger point, and now has an eating animation of 1.6 s (like all other food). When Zombie Flesh and Raw Chicken was canned, it would yield 1 Canned Food that causes no effect. |
| 1.42 | Spider Eyes may now be canned into normal food, cleansing it. |
| 1.109 | Canning bad food will result in a different type of Canned Food that when consumed, gives the Hunger debuff. |
HAYO[edit]
Weren't you ever peacefully exploring the vast landscape and got suddenly attacked by hordes of suddenly appearing, highly dangerous monsters?
Sure, with the right equipment, especially if you are using our precious technology, you can fend these beast off. But somewhen, you get hungry, and what then?
For long travels, you will need abnormous amounts of food. And as everyone knows, food takes up quite a lot of space in every backpack.
Tin Cans can make your life much easier...
if combined with the Unmobile Food Canning Machine GTA4!
This device is capable of splitting ANY kind of sourve into it's basic components and mixing them up to a healthy, yet tasty mash.
As well, it can fill this mash with an amazing speed into tin cans and seal them up for unlimited expiry dates!
| ||
| ||