Difference between revisions of "Template:Grid/Canning Machine"
m (It could be this which makes it not work?) |
m (Last finishing touches) |
||
| (21 intermediate revisions by the same user not shown) | |||
| Line 1: | Line 1: | ||
<div style="float:{{#if:{{{float|}}}|{{{float}}}|left}};"> | <div style="float:{{#if:{{{float|}}}|{{{float}}}|left}};"> | ||
<div style="left:0px; top:0px; width:288px; height:210px; position:relative;"> | <div style="left:0px; top:0px; width:288px; height:210px; position:relative;"> | ||
{{#if:{{{input-tank|}}}|{{FluidGauge|left=77|top=92|width=24|height=94|max=10000|fill={{{input-fill|0}}}|tank={{{input-tank|}}}}}|<div style="left:77px; top:92px; position:absolute; width:24px; height:94px;">[[Image:Tank Empty.png|24px|link=|alt=]]</div>}} | |||
{{#if:{{{input-tank|}}}|{{FluidGauge|left=77|top=92|width=24|height=94|max=10000|fill={{{input-fill|0}}}|tank={{{input-tank | |||
<!-- ^ Input (Left) Tank --> | <!-- ^ Input (Left) Tank --> | ||
{{#if:{{{output-tank|}}}|{{FluidGauge|left=233|top=92|width=24|height=94|max=10000|fill={{{output-fill|0}}}|tank={{{output-tank | {{#if:{{{output-tank|}}}|{{FluidGauge|left=233|top=92|width=24|height=94|max=10000|fill={{{output-fill|0}}}|tank={{{output-tank|}}}}}|<div style="left:233px; top:92px; position:absolute; width:24px; height:94px;">[[Image:Tank Empty.png|24px|link=|alt=]]</div>}} | ||
<!-- ^ Output (Right) Tank --> | <!-- ^ Output (Right) Tank --> | ||
<div style="left:0px; top:0px; position:absolute; width:288px; height:210px;">[[Image:GUI_Canning_Machine.png|288px|link=|alt=]]</div> | <div style="left:0px; top:0px; position:absolute; width:288px; height:210px;">[[Image:GUI_Canning_Machine.png|288px|link=|alt=]]</div> | ||
<!-- ^ Background --> | <!-- ^ Background --> | ||
<div style="left: | <div style="left:0px; top:9px; width:288px; font-size:16px; text-align:center; font-family:Minecraftia; position:absolute;">[[Canning Machine]]</div> | ||
<!-- ^ Title --> | <!-- ^ Title --> | ||
<div style="left:24px; top:124px; width:14px; height:26px; position:absolute;">[[Image:Power_Bolt.png|14px|link=|alt=]]</div> | <div style="left:24px; top:124px; width:14px; height:26px; position:absolute;">[[Image:Power_Bolt.png|14px|link=|alt=]]</div> | ||
<!-- ^ Power Bolt --> | <!-- ^ Power Bolt --> | ||
<div style="left:117px; top:162px; width:100px; height:28px; position:absolute;">[[Image:GUI_Canning_Machine_{{{mode|A}}}.png|100px|link=|alt=]]</div> | <div class="tooltip" title="{{#switch:{{{mode|A}}}|A=Canning|B=Fill Cell from Tank|C=Fill Tank from Cell|D=Fluid Enrich}}" style="left:117px; top:162px; width:100px; height:28px; position:absolute;">[[Image:GUI_Canning_Machine_{{{mode|A}}}.png|100px|link=|alt=]]</div> | ||
<!-- ^ Change mode icons --> | <!-- ^ Change mode icons --> | ||
<div style="left:109px; top:84px; width:116px; height:74px; position:absolute;">[[Image:GUI_Canning_Machine_{{{mode|A}}}1.png|116px|link=|alt=]]</div> | <div style="left:109px; top:84px; width:116px; height:74px; position:absolute;">[[Image:GUI_Canning_Machine_{{{mode|A}}}1.png|116px|link=|alt=]]</div> | ||
<!-- ^ Change mode icons --> | <!-- ^ Change mode icons --> | ||
{{#if:{{{top|{{{can|}}}}}}|<div style="left:73px; top:34px; width:32px; height:32px; position:absolute;"> | {{#if:{{{top|{{{can|}}}}}}|<div style="left:73px; top:34px; width:32px; height:32px; position:absolute;">{{Gc|{{#if:{{{top-tooltip|{{{can-tooltip|}}}}}}|[{{{top-tooltip|{{{can-tooltip}}}}}}]}}{{{top|{{{can|}}}}}}{{#if:{{{left-link|{{{can-link|}}}}}}|~{{{left-link|{{{can-link}}}}}}}}}}</div>}} | ||
{{#if:{{{left-image|{{{can-image|}}}}}}|[[Category:Crafting Grids in need of fixing]]}} | |||
<!-- ^ Can/Left Input Slot --> | <!-- ^ Can/Left Input Slot --> | ||
{{#if:{{{ | {{#if:{{{right|{{{output|}}}}}}|<div style="left:229px; top:34px; width:32px; height:32px; position:absolute;">{{Gc|{{#if:{{{right-tooltip|{{{output-tooltip|}}}}}}|[{{{right-tooltip|{{{output-tooltip}}}}}}]}}{{{right|{{{output|}}}}}}{{#if:{{{right-link|{{{output-link|}}}}}}|~{{{right-link|{{{output-link}}}}}}}}}}</div>}} | ||
{{#if:{{{right-image|{{{output-image|}}}}}}|[[Category:Crafting Grids in need of fixing]]}} | |||
<!-- ^ Right/Output Slot --> | <!-- ^ Right/Output Slot --> | ||
{{#if:{{{middle|{{{input|}}}}}}<!-- | {{#if:{{{middle|{{{input|}}}}}}<!-- | ||
-->|{{#ifeq:{{{mode|A}}}|A|<div style="left:151px; top:88px; width:32px; height:32px; position:absolute;"><!-- | -->|{{#ifeq:{{{mode|A}}}|A|<div style="left:151px; top:88px; width:32px; height:32px; position:absolute;"><!-- | ||
--> | -->{{Gc|{{#if:{{{middle-tooltip|{{{input-tooltip|}}}}}}|[{{{middle-tooltip|{{{input-tooltip}}}}}}]}}{{{middle|{{{input|}}}}}}{{#if:{{{middle-link|{{{input-link|}}}}}}|~{{{middle-link|{{{input-link}}}}}}}}}}</div>|<!-- | ||
-->{{#ifeq:{{{mode|A}}}|D|<div style="left:151px; top:88px; width:32px; height:32px; position:absolute;"> | -->{{#ifeq:{{{mode|A}}}|D|<div style="left:151px; top:88px; width:32px; height:32px; position:absolute;"> | ||
{{Gc|{{#if:{{{middle-tooltip|{{{input-tooltip|}}}}}}|[{{{middle-tooltip|{{{input-tooltip}}}}}}]}}{{{middle|{{{input|}}}}}}{{#if:{{{middle-link|{{{input-link|}}}}}}|~{{{middle-link|{{{input-link}}}}}}}}}}</div> | |||
|}}}}}} | |}}}}}} | ||
<!-- ^ Middle/Input Slot --> | <!-- ^ Middle/Input Slot --> | ||
{{#ifeq:{{{mode|A}}}|A| | |||
{{#if:{{{IA|}}}| | |||
<div style="left:184px; top:108px; width:16px; height:16px; position:absolute; overflow:hidden;" {{#if:{{{middle|{{{input|}}}}}}|class="tooltip" title="{{{middle|{{{input}}}}}}"}}> | |||
<div style="left:{{#expr:-16 * (floor({{{IA|}}}/10) - 1)}}px; top:-8px; width:160px; height:16px; position:absolute;"> | |||
[[Image:GridNumbersCSS.png|160px|link={{#if:{{{middle-link|{{{input-link|}}}}}}|{{{middle-link|{{{input-link}}}}}}|{{{middle|{{{input}}}}}}}}|alt={{{middle|{{{input}}}}}}]] | |||
</div> | |||
</div> | |||
<div style="left:172px; top:108px; width:16px; height:16px; position:absolute; overflow:hidden;" {{#if:{{{middle|{{{input|}}}}}}|class="tooltip" title="{{{middle|{{{input}}}}}}"}}> | |||
<div style="left:{{#expr:-16 * (({{{IA|}}} - 1) mod 10)}}px; top:-8px; width:160px; height:16px; position:absolute;"> | |||
[[Image:GridNumbersCSS.png|160px|link={{#if:{{{middle-link|{{{input-link|}}}}}}|{{{middle-link|{{{input-link}}}}}}|{{{middle|{{{input}}}}}}}}|alt={{{middle|{{{input}}}}}}]] | |||
</div> | |||
</div> | |||
}} | |||
|{{#ifeq:{{{mode|A}}}|D| | |||
{{#if:{{{IA|}}}| | |||
<div style="left:184px; top:108px; width:16px; height:16px; position:absolute; overflow:hidden;" {{#if:{{{middle|{{{input|}}}}}}|class="tooltip" title="{{{middle|{{{input}}}}}}"}}> | |||
<div style="left:{{#expr:-16 * (floor({{{IA|}}}/10) - 1)}}px; top:-8px; width:160px; height:16px; position:absolute;"> | |||
[[Image:GridNumbersCSS.png|160px|link={{#if:{{{middle-link|{{{input-link|}}}}}}|{{{middle-link|{{{input-link}}}}}}|{{{middle|{{{input}}}}}}}}|alt={{{middle|{{{input}}}}}}]] | |||
</div> | |||
</div> | |||
<div style="left:172px; top:108px; width:16px; height:16px; position:absolute; overflow:hidden;" {{#if:{{{middle|{{{input|}}}}}}|class="tooltip" title="{{{middle|{{{input}}}}}}"}}> | |||
<div style="left:{{#expr:-16 * (({{{IA|}}} - 1) mod 10)}}px; top:-8px; width:160px; height:16px; position:absolute;"> | |||
[[Image:GridNumbersCSS.png|160px|link={{#if:{{{middle-link|{{{input-link|}}}}}}|{{{middle-link|{{{input-link}}}}}}|{{{middle|{{{input}}}}}}}}|alt={{{middle|{{{input}}}}}}]] | |||
</div> | |||
</div> | |||
}} | |||
|}}}} | |||
{{#if:{{{middle-image|{{{input-image|}}}}}}|[[Category:Crafting Grids in need of fixing]]}} | |||
<!-- ^ Middle/Input Slot Multi-Item Number --> | |||
{{#if:{{{battery|}}}|<div style="left:16px; top:160px; width:32px; height:32px; position:absolute;"> | {{#if:{{{battery|}}}|<div style="left:16px; top:160px; width:32px; height:32px; position:absolute;"> | ||
[ | {{Gc|{{#if:{{{battery-tooltip|}}}|[{{{battery-tooltip}}}]}}{{{battery}}}{{#if:{{{battery-link|}}}|~{{{battery-link}}}}}}}</div>}} | ||
<!-- ^ | {{#if:{{{battery-image|}}}|[[Category:Crafting Grids in need of fixing]]}} | ||
<!-- ^ Battery Slot --> | |||
{{#if:{{{input-tank|}}}|<div class="tooltip" title="{{{input-tank}}}" style="left:77px; top:92px; width:24px; height:94px; position:absolute;">[[Image:GUI_Tank_Hack.png|24px|link={{#if:{{{input-tank-link|}}}|{{{input-tank-link}}}}}|alt=]]</div>}} | |||
<!-- ^ Input (Left) Tank Link Hack --> | |||
{{#if:{{{output-tank|}}}|<div class="tooltip" title="{{{output-tank}}}" style="left:233px; top:92px; width:24px; height:94px; position:absolute;">[[Image:GUI_Tank_Hack.png|24px|link={{#if:{{{output-tank-link|}}}|{{{output-tank-link}}}}}|alt=]]</div>}} | |||
<!-- ^ Output (Right) Tank Link Hack --> | |||
</div> | </div> | ||
</div> | </div> | ||
{{#if:{{{nobreak|}}}||{{-}}}} | {{#if:{{{nobreak|}}}||{{-}}}}<noinclude> | ||
<noinclude> | |||
{{Documentation}} | {{Documentation}} | ||
[[Category:Updated Template]] | [[Category:Updated Template]] | ||
</noinclude> | </noinclude> | ||
Latest revision as of 21:49, 17 March 2015
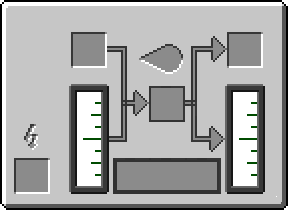
This template is used to create a machine GUI that looks similar to the Canning Machine's GUI screen.
Usage[edit]
{{Grid/Canning Machine
|mode=D
|can=Empty Cell
|input-tank=Distilled Water
|input-fill=1000
|input=Lapis Lazuli Dust
|output=Coolant Cell
|output-tank=Coolant
|output-fill=1000
|battery=RE Battery (Charged)
}}
makes:
Additional Usage Information[edit]
Tanks[edit]
The tanks in the canning machine template are cutting edge technology, only for IC2 - HAYO!
As you can see in the example above, a tank needs to fields to be set - the input/output-tank and input/output-fill.
The -tank is what fluid should be in the tank. The currently available fluids are Water, Distilled Water and Coolant, but more can be added if necessary.
The -fill changes how much fluid is in the tank, and is measured in milli-buckets. The maximum value is 10000, although larger values can be entered, they will just show the tank as full.
Mode[edit]
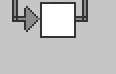
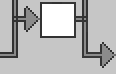
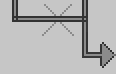
There are 4 modes that the canning machine can be in: Canning, Fill Cell from Tank, Fill Tank from Cell and Fluid Enrich. In order to keep making the template simpler, those 4 modes (in that order) are A, B, C and D. By default, the canning machine uses mode A (Canning).
{{Grid/Canning Machine
}}
|
{{Grid/Canning Machine
|mode=A
}}
|
{{Grid/Canning Machine
|mode=B
}}
|
{{Grid/Canning Machine
|mode=C
}}
|
{{Grid/Canning Machine
|mode=D
}}
|
|
|
|
|
|
|

Alternative Names[edit]
The template is flexible: left can be used instead of can, middle can be used instead of input and right be used instead of output.
As with the newer templates, -link can be added to change where an item links to (such as Iron going to Non-IC Items). This works for the tanks as well as the items.
Adding IA will allow to number of items in the input/middle slot to be shown.
{{Grid/Canning Machine
|mode=D
|input-tank=Water
|input-fill=1000
|input-tank-link=Non-IC Items
|input=Lapis Lazuli Dust
|IA=8
|output-tank=Coolant
|output-fill=1000
|output-tank-link=Coolant (Fluid)
|battery=RE Battery (Charged)
}}
makes:
Note[edit]
When uploading images for this, or any other template, (if they are missing) then the following standard is used:
Grid_item name.png -- A 32x32 image of the item as it appears in a player's inventory.
If a new fluid texture is needed, you should see Chocohead, as the way to make them is a little strange ;)
See also[edit]
{{Grid/Machine}}
The above documentation is transcluded from Template:Grid/Canning Machine/doc. (edit | history)