Difference between revisions of "Template:Grid/Metal Former"
m (More shifting will be needed) |
m (minecraft font) |
||
| (38 intermediate revisions by 2 users not shown) | |||
| Line 1: | Line 1: | ||
<div style="float:{{#if:{{{float|}}}|{{{float}}}|left}}; overflow:hidden;"><div style="left:0px; top:0px; width:274px; height:170px; position:relative;"> | |||
<div style="left:0px; top:0px; width:274px; height:170px;">[[Image:GUI_Metal_Former.png|274px|link=|alt=]]</div> | <div style="left:0px; top:0px; width:274px; height:170px;">[[Image:GUI_Metal_Former.png|274px|link=|alt=]]</div> | ||
<div style="left:114px; top:114px; width:40px; height:40px; position:absolute;">[[Image: | <div style="left:114px; top:114px; width:40px; height:40px; position:absolute;">[[Image:Metal_Former_{{{Mode|Rolling}}}.png|40px|link=|alt=]]</div> | ||
<div style="left:85px; top:15px; font-size:18px; position:absolute;font-family:'MinecraftFont';">[[Metal Former]]</div> | |||
{{#if:{{{Top|}}}|<div style="left: | <!--137--> | ||
[[Image:{{#if:{{{Top-image|}}}|{{{Top-image}}}|Grid_{{{Top}}}.png}}|32px|link={{#if:{{{Top-link|}}}|{{{Top-link}}}|{{{Top}}}}}|alt={{{Top}}}]] | <div style="left:88px; top:82px; width:92px; height:18px; position:absolute;">[[Image:Metal_Former_Progress_Bar.png|92px|link=|alt=]]</div> | ||
<div style="left:24px; top:82px; width:14px; height:26px; position:absolute;">[[Image:Power_Bolt.png|14px|link=|alt=]]</div> | |||
{{#if:{{{Top|{{{Input|}}}}}}|<div style="left:18px; top:37px; width:32px; height:32px; position:absolute;"> | |||
[[Image:{{#if:{{{Top-image|{{{Input-image|}}}}}}|{{{Top-image|{{{Input-image}}}}}}|Grid_{{{Top|{{{Input|Missing Texture}}}}}}.png}}|32px|link={{#if:{{{Top-link|{{{Input-link|}}}}}}|{{{Top-link|{{{Input-link}}}}}}|{{{Top|{{{Input}}}}}}}}|alt={{{Top|{{{Input}}}}}}]] | |||
</div>}} | </div>}} | ||
{{#if:{{{Bottom|}}}|<div style="left:18px; top: | {{#if:{{{Bottom|}}}|<div style="left:18px; top:109px; width:32px; height:32px; position:absolute;"> | ||
[[Image:{{#if:{{{Bottom-image|}}}|{{{Bottom-image}}}|Grid_{{{Bottom}}}.png}}|32px|link={{#if:{{{Bottom-link|}}}|{{{Bottom-link}}}|{{{Bottom}}}}}|alt={{{Bottom}}}]] | [[Image:{{#if:{{{Bottom-image|}}}|{{{Bottom-image}}}|Grid_{{{Bottom}}}.png}}|32px|link={{#if:{{{Bottom-link|}}}|{{{Bottom-link}}}|{{{Bottom}}}}}|alt={{{Bottom}}}]] | ||
</div>}} | </div>}} | ||
| Line 14: | Line 17: | ||
{{#if:{{{Output|}}}|<div style="left:216px; top: | {{#if:{{{Output|}}}|<div style="left:216px; top:74px; width:32px; height:32px; position:absolute;"> | ||
[[Image:{{#if:{{{Output-image|}}}|{{{Output-image}}}|Grid_{{{Output|}}}.png}}|32px|link={{#if:{{{Output-link|}}}|{{{Output-link}}}|{{{Output}}}}}|alt={{{Output}}}]] | [[Image:{{#if:{{{Output-image|}}}|{{{Output-image}}}|Grid_{{{Output|}}}.png}}|32px|link={{#if:{{{Output-link|}}}|{{{Output-link}}}|{{{Output}}}}}|alt={{{Output}}}]] | ||
</div>}} | </div>}} | ||
| Line 22: | Line 25: | ||
{{#if:{{{OA|}}}| | {{#if:{{{OA|}}}| | ||
<div style="left: | <div style="left:227px; top:100px; width:16px; height:16px; position:absolute; overflow:hidden;"> | ||
<div style="left:{{#expr:-16 * (floor({{{OA|}}}/10) - 1)}}px; top:-8px; width:160px; height:16px; position:absolute;"> | <div style="left:{{#expr:-16 * (floor({{{OA|}}}/10) - 1)}}px; top:-8px; width:160px; height:16px; position:absolute;"> | ||
[[Image:GridNumbersCSS.png|160px|link={{#if:{{{Output-link|}}}|{{{Output-link}}}|{{{Output}}}}}|alt={{{Output}}}]] | [[Image:GridNumbersCSS.png|160px|link={{#if:{{{Output-link|}}}|{{{Output-link}}}|{{{Output}}}}}|alt={{{Output}}}]] | ||
</div> | </div> | ||
</div> | </div> | ||
<div style="left: | <div style="left:240px; top:100px; width:16px; height:16px; position:absolute; overflow:hidden;"> | ||
<div style="left:{{#expr:-16 * (({{{OA|}}} - 1) mod 10)}}px; top:-8px; width:160px; height:16px; position:absolute;"> | <div style="left:{{#expr:-16 * (({{{OA|}}} - 1) mod 10)}}px; top:-8px; width:160px; height:16px; position:absolute;"> | ||
[[Image:GridNumbersCSS.png|160px|link={{#if:{{{Output-link|}}}|{{{Output-link}}}|{{{Output}}}}}|alt={{{Output}}}]] | [[Image:GridNumbersCSS.png|160px|link={{#if:{{{Output-link|}}}|{{{Output-link}}}|{{{Output}}}}}|alt={{{Output}}}]] | ||
| Line 33: | Line 36: | ||
</div> | </div> | ||
}} | }} | ||
</div></div>{{#if:{{{nobreak|}}}||{{-}}}} | </div></div>{{#if:{{{nobreak|}}}||{{-}}}}<noinclude> | ||
<noinclude> | |||
{{Template:Grid/Metal Former/doc}} | {{Template:Grid/Metal Former/doc}} | ||
[[Category: | [[Category:Updated Template]] | ||
</noinclude> | </noinclude> | ||
Latest revision as of 16:13, 11 August 2015
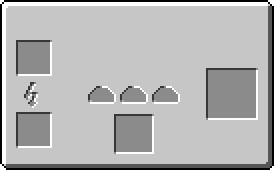


This template is used to create a machine GUI that looks similar to the Metal Former's GUI screen.
Usage[edit]
{{Grid/Metal Former
|Mode=Rolling
|Input=Tin
|Output=Tin Plate
|Bottom=RE Battery (Charged)
}}
makes:


Additional Usage Information[edit]
Top can be used instead of Input, and will override Input if both are provided:
{{Grid/Metal Former
|Mode=Cutting
|Input=Copper Plate
|Top=Tin Plate
|Output=Tin Cable
|Bottom=RE Battery (Charged)
}}
makes:


Mode does not need to be given, and will default to rolling if it is not.
{{Grid/Metal Former
}}
|
{{Grid/Metal Former
|Mode=Rolling
}}
|
{{Grid/Metal Former
|Mode=Cutting
}}
|
{{Grid/Metal Former
|Mode=Extruding
}}
|

As with the Crafting Table template, -link can be added to change where an item links to (such as Iron going to Non-IC Items) and |OA= can be added after the output to increase the products:
{{Grid/Metal Former
|Mode=Cutting
|Top=Tin Plate
|Output=Tin Cable |OA=3
|Bottom=RE Battery (Charged)
}}
makes:

Note[edit]
When uploading images for this, or any other template, (if they are missing) then the following standard is used:
Grid_item name.png -- A 32x32 image of the item as it appears in a player's inventory.
See also[edit]
{{Grid/Machine}}
The above documentation is transcluded from Template:Grid/Metal Former/doc. (edit | history)